Raspberry Pi GPIO paper template
06/17/2019 (10960x read)

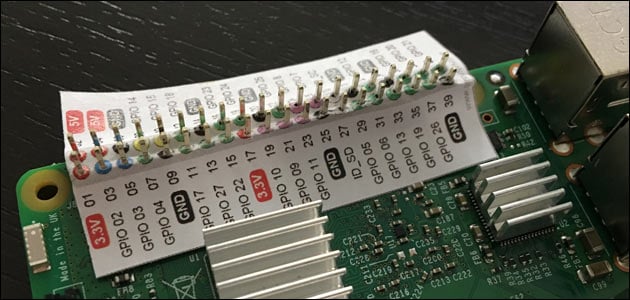
Print out the paper template and put it onto your Raspberry’s GPIO ports: This way you’ll always know what each pin does!
Download: GPIO Pin template
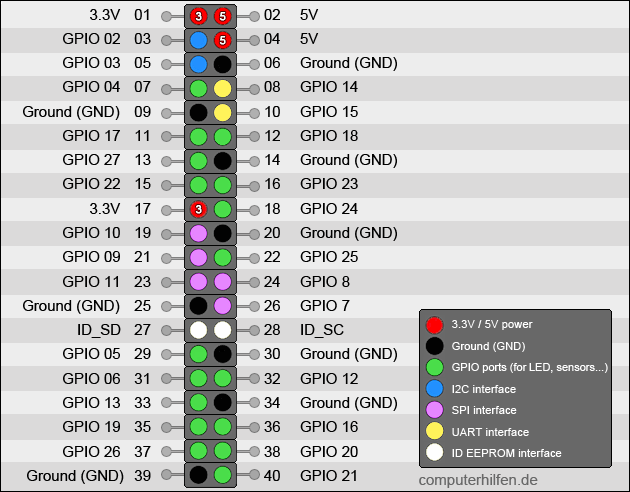
This sketch gives an overview of the GPIO pins (General Purpose in / Out) of the Raspberry Pi: While some of the pins supply 3.3V or 5V current, others can be controlled by software: Here the status can be queried with a program or current can be sent on request: for example, a connected LED can set to blink or data from a sensor can be read.

The graphic shows the meaning of every GPIO pin of the newer Raspberry Pi models with a 40 pin connector. The very first Raspberry model had only 26 pins, which were differently assigned. The pin assignment shown here shows the connection of the Raspberry Pi B+, 2 and 3.
The GPIO pin template for printing
With our printable template you have a direct view of the GPIO ports of the Raspberry. That’s perfect if you want to try something out quickly with a breadboard and jumper cables. The GPIO template can easily be downloaded and printed out. The best way is to scratch out the dots with a knife before putting it onto the Raspberry Pi.
Afterwards you can put the template on the Raspberry: switch it off beforehand so that you don’t cause a short circuit if you press the template with a screwdriver or similar!
Download: GPIO Template
 |
 |
 |
All three files contain the same information, suitable for the Raspberry Pi 1B, 2, 3 and 3B+. However, if the printer prints the first two files too large, the PDF on the right side helps you out: It contains the entire DIN A4 page.
For printing, an output of 100% and a resolution of 300 dpi should be set so that the printer does not scale the image – otherwise it won’t fit on the GPIO pins in the Raspberry!

